Making a media player from Raspberry Pi
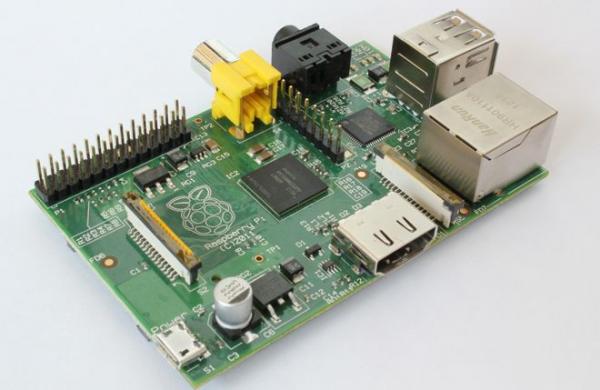
The Raspberry Pi is a very cheap computer that's no bigger than a credit card. It's the brainchild of the Raspberry Pi Foundation, a charity devoted to promoting 'back-to-basics' computer science in schools – as opposed to simply teaching the kiddies how to use spreadsheets and design web pages on Windows PCs. What was needed, reckoned the Raspberry Pi gang, was an affordable computer that could encourage children to experiment with programming and electronics – the sort of thing that went on during the home computer boom of the 1980s and gave birth to a generation of entrepreneurs.
You could, of course, use an old PC to learn these skills, replacing any existing version of Windows with a copy of the Linux open-source operating system, for which many programming languages are available. However, PCs are often bulky and power hungry; only laptops get close to the physical dimensions of those '80s-era home computers. Another PC disadvantage is the inability to interface with the outside world beyond immediate peripheral devices and a network, whereas many vintage home computers offered a machine-specific user port, allowing hookup of various electronic contraptions (of your own design, or someone else's). In the era of Duran Duran and Spandau Ballet, there was a cottage industry for these gizmos, ranging from joysticks to music synthesisers (well, it was the 80s...) and simple robots.
This is the reason for the Raspberry Pi. It's affordable – typically £35 – and will plug into a TV set via HDMI. Composite video and analogue stereo audio are offered for older displays. Keyboards, mice and other peripherals connect via USB. There are only two ports, but multiple USB devices can be accommodated via a hub. It's very energy-efficient, and a battery could be used to power it as an alternative to a five-volt micro-USB plug.
A key feature of the device is its programmable user port, known as GPIO (General Purpose Input/Output). Various devices can be attached to this collection of pins. If you want to put your Raspberry Pi in control, this is important, as your motors, switches, sensors and relays would be interfaced to the GPIO pins via the necessary circuitry. Some experimenters have built a Raspberry Pi at the heart of home automation systems, security alarms, retro arcade-style games consoles, ambient music generators and even automated home breweries.
Finally, there's an SDHC card slot. This is typically used to accommodate the operating system (often Linux) and other software, rather like the hard drive of a conventional PC.
The version I use is the 'Model B'. A cheaper Model A only specifies one USB port, has half the current Model B's 512MB memory and dispenses with Ethernet. In other respects, both models are identical.
One of the reasons for its low cost and small size is that nearly all of the Raspberry Pi's functionality is built into a single BCM2835 'jungle' chip. This device is made by Broadcom, one of the Raspberry Pi Foundation's supporters, and is based around a British-designed 700MHz ARM RISC microprocessor, of the type that you'll find in many mobile phones and set-top boxes. Also in the chip is a graphics engine, which supports a number of resolutions, including 1080p, and is capable of decoding HDTV video streams in real-time. All of this makes the diminutive Raspberry Pi surprisingly powerful – certainly more so than the average turn-of-the-millennium PC or Mac.
Player potential?So the Raspberry Pi, a device intended mainly as an educational tool, has the basic elements needed to be configured as a multimedia player. It just needs some software. Handily, the powerful, free and open-source Xbox Media Center (XBMC) had been ported to the Raspberry Pi by a clever King's College student called Sam Nazarko – proof, if any were needed, that the Raspberry Pi Foundation's goals are being realised.
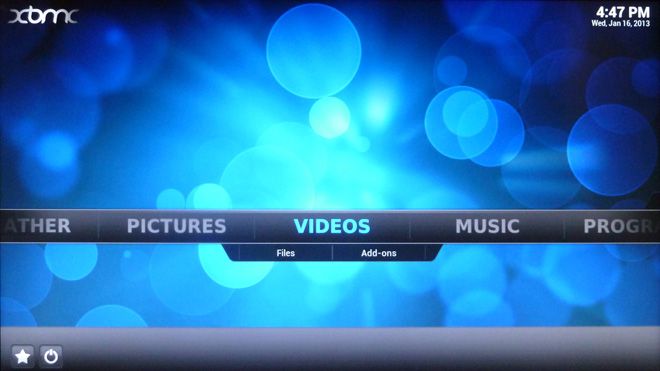
Named RaspBMC, it is built around the Raspbian Linux distribution. XBMC started life a few years ago on Microsoft's Xbox games console. Unlike its Xbox 360 successor, the original console could be hacked to run a dashboard providing easy access to any compatible non-Xbox software you chose to install – XBMC apart, the roster included vintage games emulators, operating systems like Linux and even older versions of Windows. You could install a larger hard drive (the one fitted by Microsoft was a mere 8GB) to accommodate your various multimedia files. An alternative was to play content via disc or from networked storage courtesy of the Xbox's Ethernet port.
Over time, XBMC acquired a beautifully slick user interface and the ability to cope with practically any multimedia format you could throw at it. The limited Xbox hardware could not, however, support hi-def video or other punishing formats. XBMC was ported to various computer platforms, including Windows, Linux and MacOS; versions are also available for iOS and Android devices. XBMC also forms the basis of Boxee, which has been built into a handful of media playback devices. Developed by the non-profit XBMC Foundation, XBMC is more flexible than what you'll find built into most set-top boxes, Smart TVs, Blu-ray players and network streamers. And so it's a solid choice for the Raspberry Pi.
Getting startedSo, you want your own open-source media player? Here's how. First of all, get hold of a Raspberry Pi. They're available from online retailers for as little as £35 (make sure you get the 512MB Rev.2 variant). Usually, only the bare board is supplied, so at the very least, you'll need a 5V power supply terminated in a micro-USB plug. A simpler option is probably the £75 starter kit sold by Maplin, which also includes a 4GB memory card containing a Linux 'distro', micro-USB power supply, a USB hub, keyboard and mouse. No case is included – but you can pick one up dirt cheap, or simply velcro it to the back of your telly, out of sight.
You'll also need another SDHC card on which to install RaspBMC, together with network and HDMI cables.
The next step is to get RaspBMC. Download the small file from http://www.raspbmc.com/download to your home computer. MacOS, Linux and Windows versions are available. You'll need at least a 2GB SD card (an SDHC card of at least 4GB capacity is recommended) and a card-reader attached to your computer. Running the program builds a bootable Linux image and transfers it to your SD card.
In a change from the usual state of affairs, the PC process is slightly easier than the Mac one. The downloaded PC file takes the form of a compressed Zip archive. Double-click on this Zip file to reveal its contents and run the setup.exe file that's visible. You're then warned that any data on the device (your SD card) that you're writing the RaspBMC image to will be erased – if you're happy with that, click 'Accept'. The RaspBMC Installer then appears, and you're given a choice of location for the image. Select the SD card that's in your card-reader, and then accept the licence agreement. Click 'install', and RaspBMC Installer begins downloading files to your SD card. When the process is complete, a 'congratulations' message will be displayed. You can then make an optional donation to the author via PayPal if you're feeling generous.
The process for Mac (and Linux) users is a little different. You need to run a script (copy and paste it from http://www.raspbmc.com/wiki/user/os-x-linux-installation/) that kicks off the process.
Now you can remove the card and plug it into your Raspberry Pi. Next, connect the device to your display/network and attach the power supply. If all is well, a scrolling display of Linux commands will appear (like one of those screens you see in the background of a sci-fi flick). When this boot sequence has completed, your monitor should go blue. Next, you should see the RaspBMC Updater's progress bar, which indicates that more files essential to the system's operation are being downloaded to your SD card. This operation can take some time, so grab a coffee while the various software modules automatically install after they've downloaded.
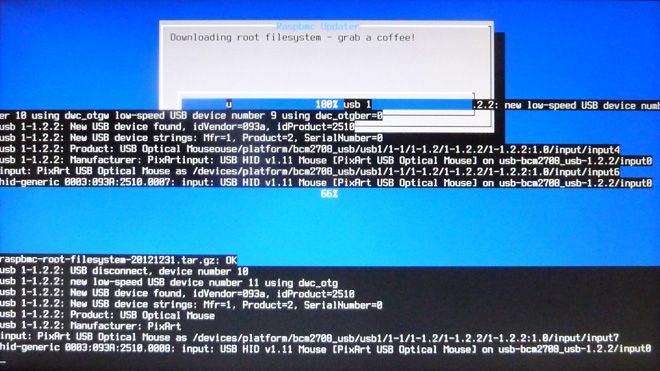
As soon as this process is complete, your Raspberry Pi will reboot. During this process, the RaspBMC logo will appear onscreen. If the logo (or a blank screen) lingers for longer than 20 minutes, the device might have crashed. If so, temporarily disconnect the power supply to reboot. You might then see more messages and progress bars onscreen as the software attempts to grab more updates online and then set itself up for the first time.
That logo will then reappear, followed by the RaspBMC configuration wizard. If you're using a TV that supports HDMI CEC you can use your TV handset to configure and drive RaspBMC. If your TV doesn't support CEC, you might need to use a keyboard and mouse to operate – any standard USB types should do, either plugged into a hub like the one supplied in the Maplin kit, or in one of the Pi's two USB ports next to the Ethernet socket. Note that your keyboard and mouse need to be connected before you boot the Raspberry Pi or they might not be recognised.
Setting upThe RaspBMC wizard prompts you to select your language. After this, the main screen appears – a horizontal carousel containing entries for weather, pictures, videos, music, programs and system. It's all very intuitive, similar to the user interface of a conventional media player.
Before exploring what's on offer, set up the unit to deliver the best results from your AV equipment. Select 'system', and from the menu that appears select the 'system' option. In the video output menu you can select the output resolution and refresh rate. If nothing's connected to the HDMI port, the analogue video output is automatically selected (you cannot have both active simultaneously).
If, for some reason, you're feeding an old CRT telly with this composite video output, it had better be multi-standard since the Raspberry Pi's output is fixed to US/Japanese standard (i.e. 720 x 480, NTSC and 60Hz refresh). As a result, UK-standard 50Hz material can look juddery. This isn't true of HDMI, which gives you the ability to automatically change the refresh rate to that of the video content being played (in the system/video menu, you'll find this option in the playback section).
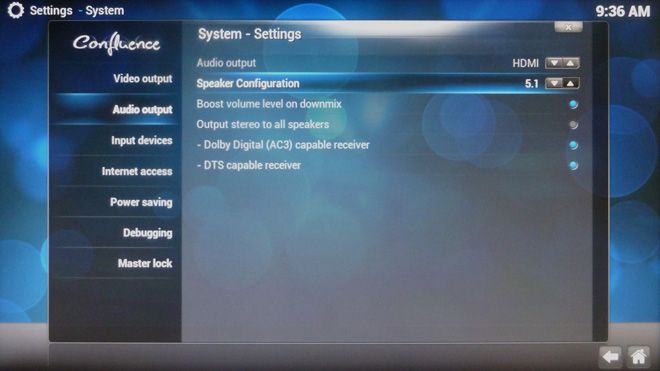
Next move on to 'audio output'. If your Raspberry Pi is connected directly to your TV, select HDMI audio output and 2.0 configuration. Disable the Dolby Digital and DTS boxes. If the device is connected with HDMI to your TV via an AV receiver or amplifier, more options are at your disposal. You can choose 5.1 or 7.1 speaker configurations, and because all modern AVRs can handle Dolby Digital and DTS bitstreams you can leave those boxes enabled, meaning you'll get discrete multichannel audio from appropriate source material (such as Blu-ray, DVD and HDTV 'rips'). Most modern AVRs will passthrough HDMI CEC commands, enabling the Raspberry Pi to still be controlled by your TV's handset. People still stuck with old-time TVs should select the analogue audio output. Note that there's no dedicated digital audio output.
Now it's time to find some content to play. Go to the relevant category of the carousel, and select the 'add...' option. You can then navigate your way around your various networked folders with the file browser and define shortcuts. uPnP, SMB and Windows (NFS) network protocols are covered. Support is also given to Apple's AirPlay streaming technology, although you have to enable this (system menu/services). Shared folders will then appear in the associated 'files' list whenever you select this category – alongside any USB storage device that happens to be plugged in. Be aware that you can share the contents of said USB device on your network; in other words, RaspBMC can act as a server as well as a client.
It's then a simple matter of selecting files you want to play, and a wide variety of codecs and formats are supported. FLAC, MP3, WMA, AAC and WAV audio files can be listened to, while JPEG, GIF, PNG and BMP still images are accepted. For video, there's DiVX, XviD, MKV, FLV and MOV. If you require MPEG-2 – which underpins standard-def TV and DVD – a key is needed to activate the function. This is because the costs associated with MPEG-2 licensing are too great to absorb in what is already a very cheap product. The good news is that adding this function yourself costs peanuts. Go to the 'buy codecs' section of the Raspberry Pi website (http://www.raspberrypi.com) and enter your Raspberry Pi's serial number – the website tells you how to do this. You can then use PayPal to make the £2.40 transaction, and you're sent a keycode that can then be entered into RaspBMC. You need to choose the RaspBMC Settings add-on from the programs carousel, and head for the configuration tab. Scroll down this list and you'll find a box where you enter the code. If you don't have a USB keyboard, an onscreen virtual keyboard is on hand instead. A similar arrangement is used to enter the £1.20 key of the Microsoft VC-1 codec (a standard specified for HD DVD, Blu-ray and Windows video), also available from the Raspberry Pi website. After entering the code, you're prompted for a restart.
Taking controlIf you don't have a TV that supports CEC via HDMI, and don't relish the prospect of using a keyboard and mouse to drive RaspBMC, alternatives are available. One option is to use the web interface. Within the RaspBMC settings add-on is a 'network configuration' tab, and from here you can discover what network IP address has been assigned to the Raspberry Pi (usually something along the lines of 192.168.x.x). Enter this address into a web browser – which could be running on a PC, tablet or smartphone connected to your network via Wi-Fi – and the remote tab you'll see contains a control panel.
If you're using a mobile device, you're better off installing a RaspBMC or XBMC remote control app. Versions are available for Android and iOS.
A final option is to connect an infra-red receiver unit to the Raspberry Pi's GPIO port. RaspBMC supports LIRC (Linux Infra-Red Remote Control), and can be configured to work with any spare handset you might have lying around. Getting LIRC to work involves messing around with scripts, though, so you've been warned.
RaspBMC is a powerful media player, but it's capable of doing a lot more. Its support for XBMC apps (known as 'add-ons') ushers in plenty of new features. Select 'get more' from the programs carousel to see a list: current choices include a Facebook media browser, artwork organiser, forum browser, media searcher, Gmail client, TV guides, BitTorrent applications, a simple text-only web browser (which I found a big buggy) and even a movie quiz. However, BBC iPlayer is conspicuous by its absence.
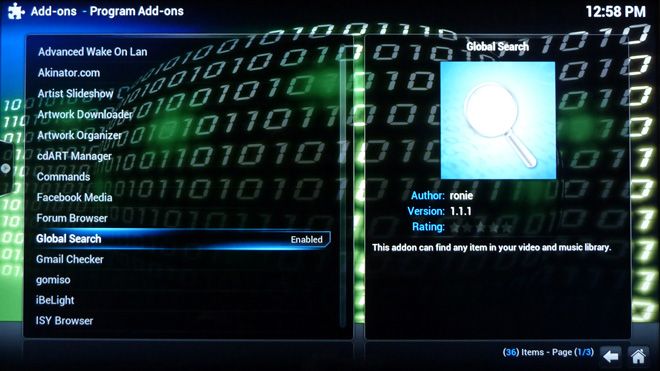
Additional category-specific plugins are available too. Go to video, and you're presented with an enormous list of add-ons that are usually specific to channels and services. The list includes CBS News, MTV Germany, Fox News, The Onion, Time, National Geographic and PBS. Some can't be accessed from the UK due to rights issues. European broadcasters like NRK and ARD (you may have seen its Tagesschau news service on a Smart TV) have a presence too. You can also watch old episodes of South Park, vintage out-of-copyright movies and, of course, YouTube content. For photos, there's Picasa, Flickr and a link to the comedy cat website Cheezburger. Audio plugins are mostly 'net radio stations (Shoutcast support is included) but there are also podcasts and audiobooks.
The Raspberry Pi's performance is excellent, providing you stick with HDMI. 1080p Blu-ray rips played smoothly at 24p, with perfectly synced DTS multichannel sound. Standard-def video, which is upscaled, also looks good, although MPEG-2 material appears a little soft; this does at least make compression artifacts less visible. Analogue video will only be of value for AV applications when (if ever) PAL/50Hz is supported. Sound quality via HDMI is solid, while the analogue outputs are more than good enough for old TVs. On the whole, RaspBMC is responsive in use, although there can be some lag, particularly with online content.
D.I.Y. solutionGoing down the Raspberry Pi media player route means you can end up with a powerful and high-performance multimedia player that's as good as (if not better than) ones selling for £100 or more. It's a great way of turning any TV into a Smart one at minimal cost. And it shouldn't be forgotten that, at the swap of a memory card, your Raspberry Pi is converted into a Linux computer, where you can learn about electronics interfacing and programming in languages like Python. Cheap, cool, fun and educational – I like it.
 |
Home Cinema Choice #351 is on sale now, featuring: Samsung S95D flagship OLED TV; Ascendo loudspeakers; Pioneer VSA-LX805 AV receiver; UST projector roundup; 2024’s summer movies; Conan 4K; and more
|
